Garden Path Refresh


A few days ago I shared a photo of the tropical garden taken from the deck at the back of the house (aka my “outdoor office”).
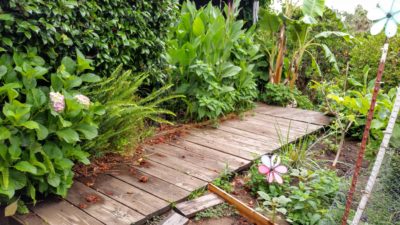
When I snapped the shot, my focus was on how green and lush everything was. But after staring at the same view for a while, it started looking less lush and more shaggy and overgrown. And the wood path was just kind of this dirt-colored “meh” thing lying on the ground drab and uninteresting. Eventually (okay, maybe 24 hours), I became obsessed cleaning up the jungle and doing something about that dirty, boring wood walkway. It wasn’t just a path after all, it was a transition from the public to the private spaces of the acre.
Now, the old me would’ve been making plans haul this old thing out, back up a lumber truck and build a whole new walk. But the new me is on a budget and must consult with his wife on any project that can’t be done with what I already own, or costs more than I can find in the couch cushions.
Coincidentally, I was rooting around in the garage a couple of weeks ago and found a big can of “gunstock red” stain left over from some long-forgotten project.
The benches and table on the front patio had needed a little reviving, so I re-stained them with it.
Despite some early concerns, they ended up looking pretty good.
I still had about half a can of stain and I could buy disposable chipboard brushes for couch money, so I figured I’d give the path a facelift.
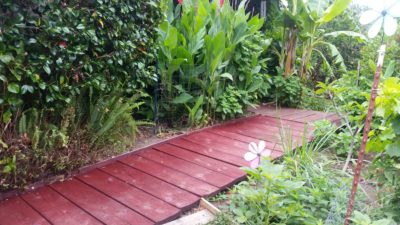
A couple days of plant trimming and power washing, followed by a couple days to stain and dry the path, and I’ve got a whole new walkway that’s not just a way to get through the garden, but now adds color and contrast to it as well.
Check out these before and after shots. (Click the image for a larger view).
Looking West
The view from the deck at the back of the house faces west toward the bananas and guava.
Looking North
The path leads from the front patio and barbecue area through the passion fruit and turns right just beyond the cannas and bananas.
Looking South
From the north gate near the edge of the deck you see the path where it turns and disappears under the passion fruit.
PROJECT NOTES
The Stain — I used an oil-based wood finish stain (the type for furniture) rather than a deck stain. I prefer that kind of stain for both indoor and outdoor applications because I think they do a better job of highlighting the richness of wood grain (deck and water-based stains seem like thin, chalky paint to me) as well as maintaining their color, bug and water resistance longer. You can usually pick up a quart (1 liter) for under $10 at your local home improvement or hardware store.
Stain Application — I use disposable chipboard/economy brushes for application. Weather-exposed wood is rough and has lots of cracks and splinters that will snag and tear cloth or sponge brushes. A 3-inch (8cm) economy brush does a far better job at application and will only cost you $2 or so. And there’s nothing to clean up at the end. Just dispose of the brush properly.
Drying Time — One of the disadvantages to oil-based stains is the longer dry time. Even those that say they dry in 2 hours, really need 24 – 48 to really set color deep before they can get wet. Make sure there’s no rain in your forecast for a few days after application so the wood fully absorbs the stain.
Total Cost — Re-staining old wood is an inexpensive way to bring it new life. I spent about $5 on brushes and $7.50 on an additional quart of stain when I ran low near the end of the project, so the whole project cost me $12.50 — easily within my couch money budget and definitely worth the investment.


