How to Build a “Lasagna” Garden
An inexpensive organic gardening hack to make garden beds with rich, nutrient-dense soil for fruits, vegetables, and flowers

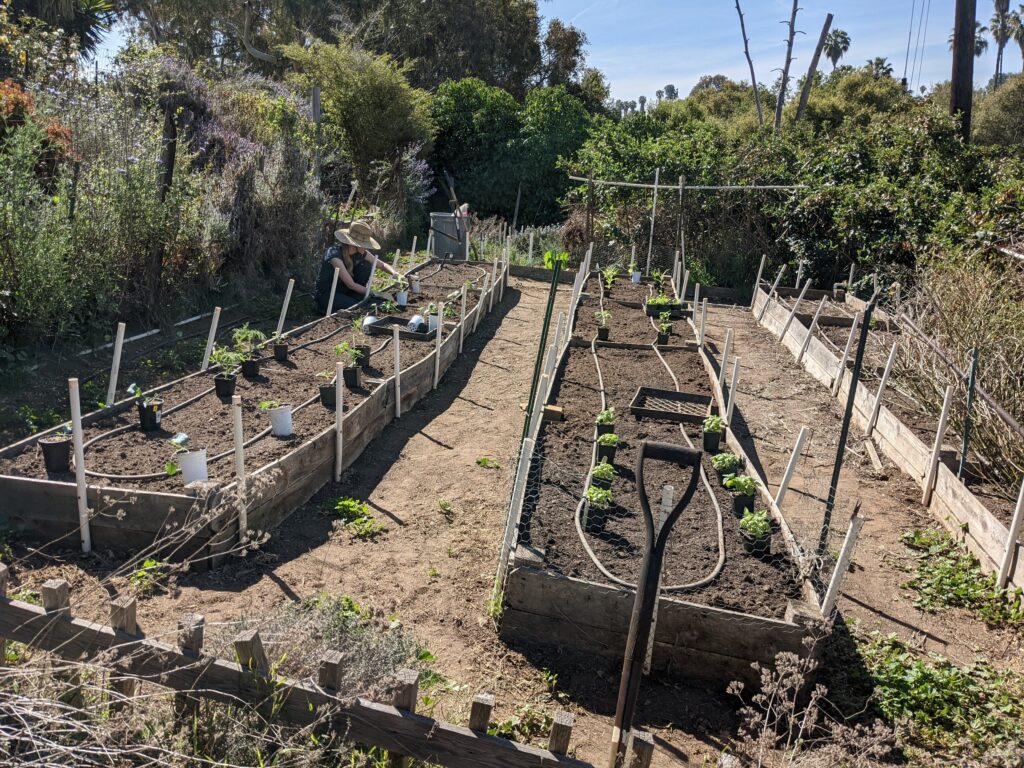
The lasagna garden beds in mid-spring
Being a guy of limited means, “cheap” (or better yet, “free”), has special appeal to me. A lot of times, “cheaper” means making trade-offs on quality or reliability. But once in a while, not only are there no trade-offs, but the cheap (or free) option is so superior, you’re a fool if you don’t use it.
The “lasagna” garden technique is one of those “you’re a fool if you don’t” options.
How to build a lasagna garden
What is a Lasagna Garden?
The lasagna garden is a type of organic garden bed. It gets its name because it’s made with alternating layers of organic matter laid down as if you were making a lasagna. Except, instead of noodles, cheese, and sauce, you’re putting down layers of soil, high nitrogen (“green”), and high carbon (“brown”) organic material and planting on top of it. It’s basically a hack of two organic gardening staples – raised beds and composting – combined to give you the best of both without twice the work.
With the lasagna technique you get better soil and healthier plants while also reducing (or in my case, nearly eliminating) yard and organic waste and water consumption.
How the Lasagna Garden Works
Without getting too technical, the lasagna garden is a raised garden bed sitting on top of a compost pile. The lower portion of the bed is filled with organic matter like leaves, sticks, grass cuttings, kitchen waste, etc. The upper portion of the bed is filled with garden soil and planted with vegetables, herbs, fruits, etc.

The lasagna garden is basically a raised bed sitting atop a compost pile
The bottom half of the bed is kept warm and moist by the top layer of soil which encourages soil-dwelling critters (insects, worms, microbes, etc.) to move in and decompose the organic material, converting it to rich, loamy and nutrient-packed soil.
As the plants above grow, their roots reach down into the compost underneath, tapping the nutrients they need for healthy growth throughout the season. Water retention and drainage in the bed are improved, and there’s no need for fertilizer or additional compost.
Better yet, at the end of the growing season, you can take the spent plants from the bed and use them in the next lasagna garden, creating a no-waste cycle where this season’s plants become next season’s compost and feed next season’s crops.
What kind of organic materials are good for the layers?
You can use nearly anything of living origin in your lasagna garden, but for the healthiest compost, you need the right proportions of carbon-rich to nitrogen-rich materials. Ideally, finished compost should have a ratio of between 25 and 30 parts carbon to 1 part nitrogen (aka: the C/N ratio).
Too much of one or the other and the microbial balance of the soil will get out of whack, and you’ll end up with problems that contribute to poor plant growth like slow decomposition, nitrogen depletion, and/or nutrient waste.
Carbon-rich (brown) materials tend to be dry, bulky, and plant-based. This includes stuff like pine needles, nutshells, cornstalks, cardboard, and even sawdust.
Nitrogen-rich (green) materials tend to be wet or gooshy, and can be plant or animal sourced. This includes grass clippings, manure, kitchen scraps, egg and seafood shells, and even hair (pet or human).
Here are some common household compostables and their C/N ratios
| Browns | C/N Ratio | Greens | C/N Ratio |
|---|---|---|---|
| Cardboard / paper | 170:1 | Coffee Grounds | 15:1 |
| Dry leaves | 80:1 | Eggshells | 5:1 |
| Dried plant stalks | 80:1 | Feathers | 4:1 |
| Hay | 60:1 | Fish / Seafood scraps | 25:1 |
| Nutshells | 100:1 | Fruit & veggie scraps | 30:1 |
| Pine needles | 100:1 | Grass Clippings | 20:1 |
| Straw | 80:1 | Manure | 15:1 |
| Sawdust | 500:1 | Weeds (young) | 30:1 |
While you’re shooting for a 30:1 C/N ratio, you don’t need to be too precise. I find a general rule of thumb of a brown layer twice the thickness of the green layer tends to work out well.
As for finding organic material for your lasagna bed, you’d be surprised how much you probably have around the house if you’re looking for it.
For us, between vines, weeds, shrubs and hedge trimmings, chicken straw, spent plants, Amazon.com (cardboard boxes), etc., we have no problem loading 20 beds every year. The brown/green mix varies based on the season, but there’s still almost always more than enough to get the job done.
Here’s a few examples of some of the organic materials we used in our lasagna beds this year.
Examples of brown layer (carbon) materials


This year, as usual, we recycled the spent tomato plants and corn stalks from last year’s garden back into the garden. Additionally, we did some heavy cutting back of the blackberry bramble so we had plenty of dry, brown canes to layer in as well.
Examples of green layer (nitrogen) materials


The wet winter meant we had a lot of growth. The passion fruit really needed to be cut back. Also, the chickens and ducks are always happy to provide plenty of manure.
If you look around your yard, you’ll no doubt find all kinds of materials that could be going into your garden rather than the waste bin. (Bonus: that stuff is free!)
How many layers do you need in your lasagna garden?
I’ve read some articles where people are making lasagna garden beds with as many as 7 layers – 3 brown, 3 green, and a soil topper.
Yikes. Unless your beds are 3 feet deep, my experience tells me that’s overkill.
Soil critters, water and plant roots do a great job of mixing layers for you, so you can get away with far fewer and still have great results.
I generally shoot for alternating brown/green layers with the brown layer no more than 6-8 inches deep (uncompressed) and topped with a green layer that’s half that thickness (3-4 inches). The soil on the top of the bed needs to be 6-8 inches deep when finished, so you can do the math to figure out how many layers you actually need for your beds.
For example, 20 of my 24 raised beds are 18 inches deep, so they have only 3 layers. The 4 others are 24 inches deep, so they have 5 layers. That’s plenty.
How to fill the lasagna bed
Filling the bed isn’t complicated, but it can be a pain if you’ve got materials that insist on sticking up rather than lying down in the bed. The easiest way to get stuff to lay flat is to cut your materials shorter than the width of the bed and make sure they don’t have branches or sticks that poke off in multiple directions.
If that doesn’t work, you can go with my tried-and-true method — stomping on it until it does lay down.
1) Start with an empty bed

Start with and empty garden bed
Add a brown layer to the bottom of the bed

Brown layer: Layer the bottom of the bed with cardboard
I always use cardboard first because it’s a barrier to burrowing animals like gophers early in the season when they’re most active.

Brown layer: Adding dried blackberry canes to the cardboard
Then I top the cardboard with a thick layer of dried blackberry canes and tossed a little soil on top to fill in some of the big air gaps and weigh the canes down a bit.
2) Add a green layer to the bed
Green layer: composted duck and chicken manure
The cardboard and blackberry cane layer has a fairly high C/N ratio – around 100:1. To get that ratio down to the 30:1 target, rather than laying on fresh plant material, I added fresh duck and chicken manure which has a C/N ratio of about 10:1.

Green layer: fresh composted poultry manure
3) Top off with soil

The bed topped off with top soil now ready for planting
Finish the bed by (re)loading it with soil. Load the bed so that the soil in the center is about an inch higher than the bed border, sloping it toward the edge. Over the next couple of days the layers underneath will settle and soil will shrink from the edge.
Once the soil looks like it’s done settling, rake the bed from the center out, leveling it, and filling the gaps at the edges.
4) Plant!
Wait a few more days, watering the bed well. The moisture will help kick up the composting activity below, making the bed slightly warmer and more inviting for the plants.
Then plant!
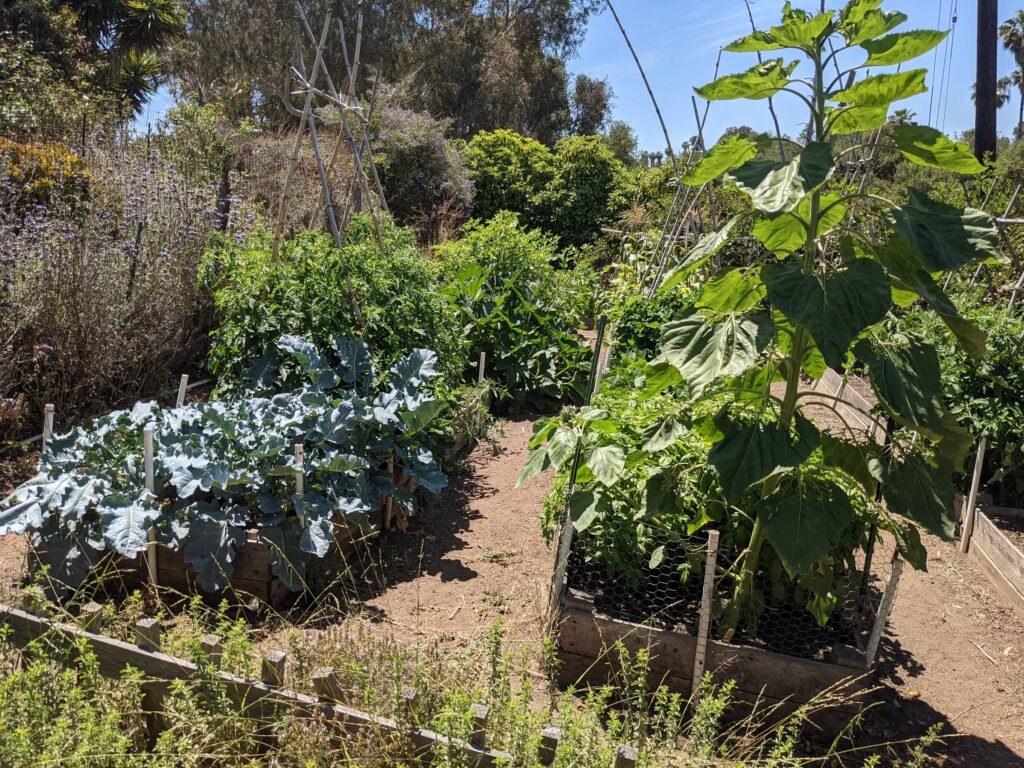
In just a few weeks you’ll see your garden go from seedlings to crazy productivity like mine.
Here’s the garden last year two months apart
Sage’s Footnote
If you like super-efficient, inexpensive and high productivity gardens, you might like my keyhole garden posts as well.


[…] water in the soil. They can be added as is and nature will process it in place (as done in the “lasagna garden” technique), which will release nutrients […]
[…] so last winter I went in and cut the whole bramble to the ground. The chopped down canes went into the bottom of the raised beds, so they’re feeding the vegetables now. The blackberry plants recovered quite well and are […]
For the 2nd year do you empty out the beds and start over?
No, generally it takes 3-4 years for all the layers to breakdown and need a refresh. However, because I don’t re-layer every bed in the same year, there are always 1 or 2 beds that get a refresh while the others continue their run. I usually take the spent plants from a bed refreshed that year and use it to re-layer a bed that hasn’t been in the past few years. Saves on hauling all that material out of the garden to the compost pile.